I have just completed a commission to interpret a finished work in a different format. The buyers had admired a pastel work of mine for some time, but were concerned that it would be too small for the space planned for it, and that the glass required on a pastel would create too many obtrusive reflections because of the adjacent large windows. Accordingly, they asked me to consider re-interpreting the work in a much larger size and in a medium that would not require glass to frame.
Here is the original work:
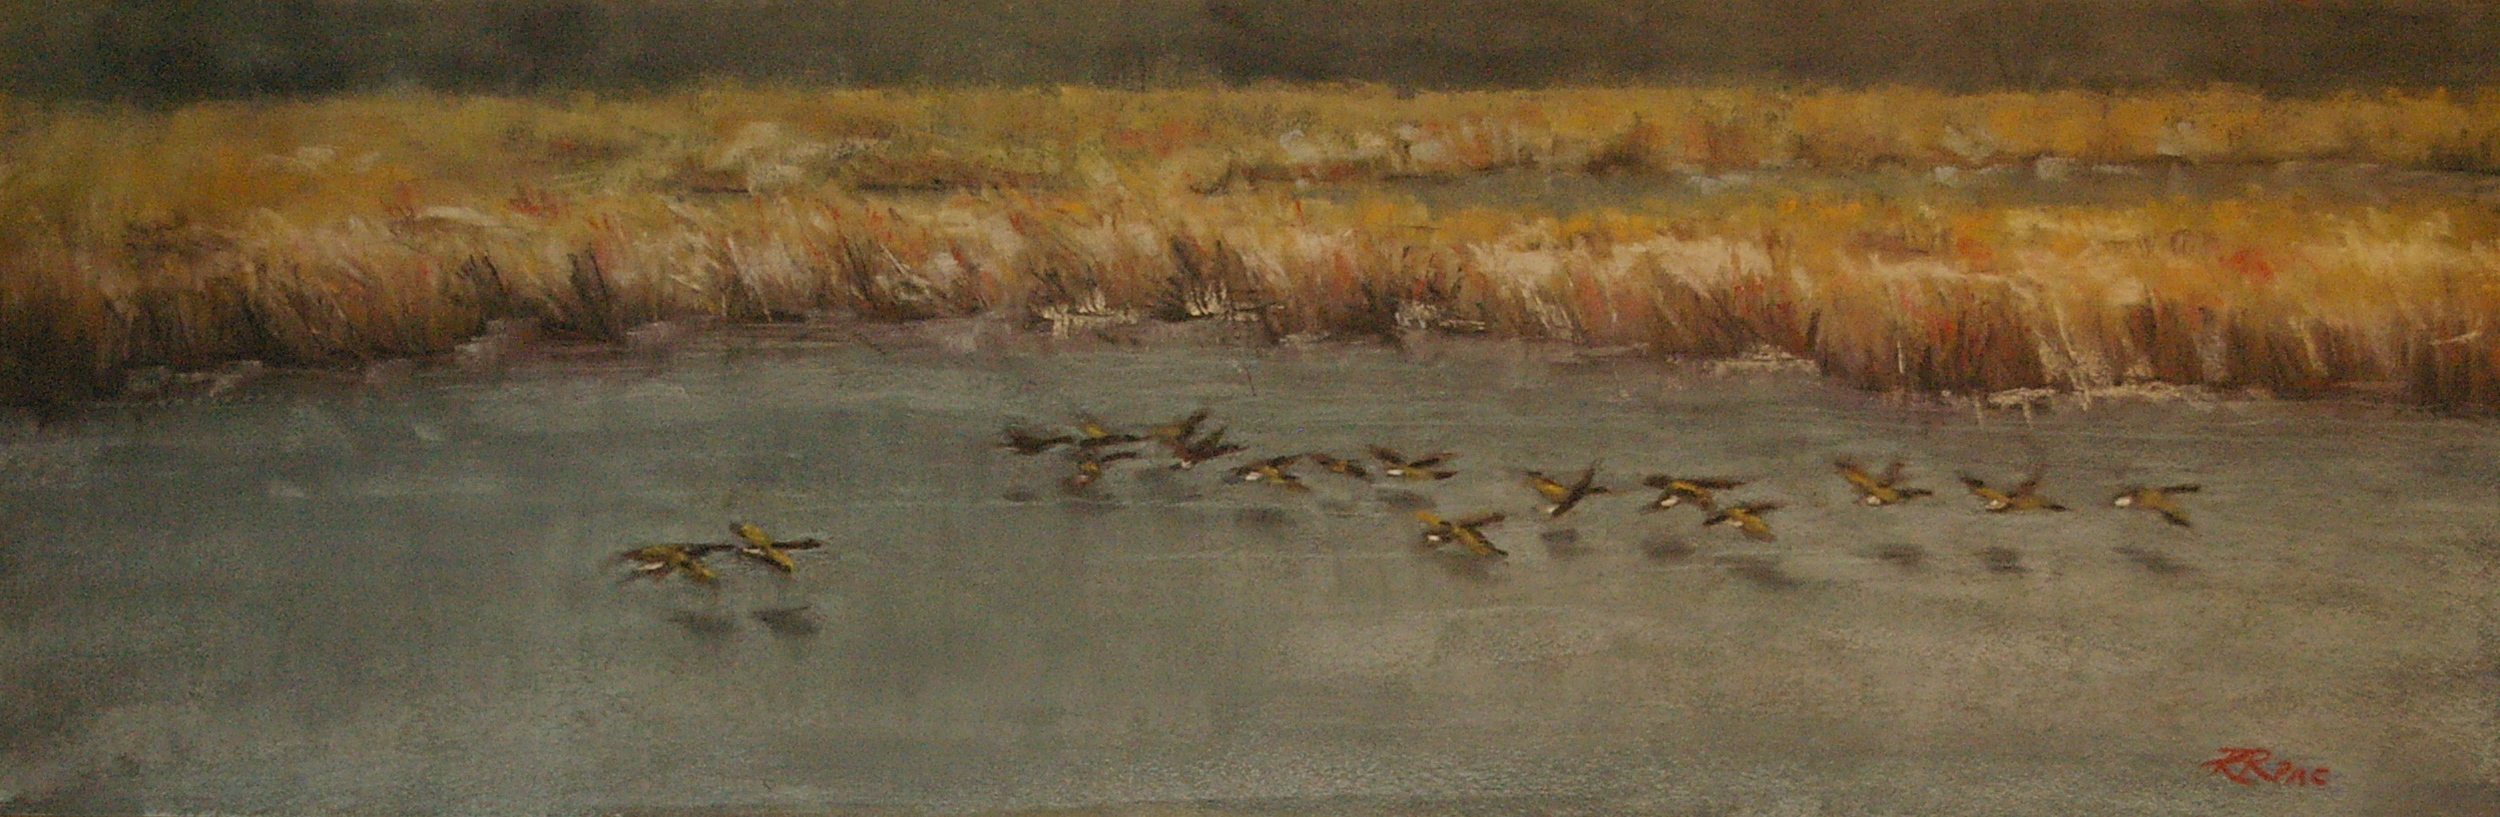
Time to Go, pastel on sanded panel, 12" x 36"; framed $750
When accepting the commission, I asked them what they admired about the pastel, and was told that it was the mood, the colours, the movement of the geese, and the oblong format that they especially liked.
After measuring the intended space, I purchased two possible canvases (30" x 60" and 36" x 72"). I tried them both in the space, and decided that it definitely needed the larger size; however, I was concerned that neither of the canvases retained the ratio of the original (1:3). I considered cutting down the larger canvas to 30" x 72" to be closer, but in the end determined that the 36" height filled the space better. Because of this decision, I decided that the composition would need a greater "depth of field" and planned to expand the scene into a greater depth. The buyers are retired geologists who have spent considerable time in tundra landscapes, and I guessed that a bigger view of a tundra marsh would appeal to them. As well, on this larger scale, a band of solid dark value in the background (as in the original) could be oppressive, so I planned to break up the space with a more varied sky.
After doing a quick thumbnail value sketch to finalize the basic composition, I sketched out the large shapes on the canvas with a pencil. Thinking that this larger format needed more textural interest than the smaller original, I then applied a texture to all the marsh grass areas. To do this, I applied a layer of thick gesso with a palette knife to each grass section, and then dragged a comb-like plastic tool through the wet gesso to create a grassy texture. As I worked, I kept perspective in mind, creating smaller scale marks on sections further in the distance in the scene.
Once the gesso was thoroughly dry, I did the first pass with acrylic, developing the foundational values and hues for all sections: a mid-dark value blue-grey for the sky and water, and a mid-value gold (my favourite Naples yellow) for all the grasses. Then, I applied variations of these colours to create depth and texture in the grasses, establishing the three-dimensional shape of them against the water areas. As I washed various colours over the textured areas, the ridges took the colour while the gold showed between--this method creates a naturally textured and believable grass effect that I find more pleasing than what can be accomplished by brushstrokes alone. As the painting progressed, I repeated this technique twice: once to raise the area of marsh and reduce the area of sky, and once to reshape the closest grass section to create a better composition. Both of these modifications improved the eye path that guides the viewer's gaze around the painting.
The water areas required only some strokes and spatters of pale grey to suggest that it had iced over, and I added some very light grey areas to the edges of the grasses to indicate areas of snow caught at their bases.
To create the desired effect in the sky, I brushed in various muted tones of cream, pale gold, and a soft rose to hint at impending dawn on the horizon at the point where the stream disappeared. The horizon itself turned out to be the most challenging part of the painting! I wanted the values to be very close so that the division between earth and sky was very muted (as it is in the far distance), yet the hues (gold/grey) needed to be just enough different to reveal the division between the two planes. Eventually I achieved this balance, but it took awhile!
Once the landscape itself was completed to my satisfaction came the scariest part: adding the geese! I knew that I had to scale up the size of the birds for this larger format, while still retaining the sense of blurred motion from the original. With the original pastel in front of me for reference, and only a basic sense of the size, shape, number, and attitude of geese required, I took a deep breath, dipped my brush in dark brown paint, and quickly sketched in all the geese at once in varying wing positions. When I let out the breath I was holding and stepped back, I saw to my relief that I had achieved the same sense of motion and direction as I had in the pastel. Phew! A few refinements in shape, and the addition of the white marks that identify these birds as Canada geese finished this step. As a final touch I added the dark shadows below the geese that suggest that the water has frozen over to ice.
I pondered the work for 24 hours, made a few more small changes, and then signed it on the front and added the title and date on the back. I called it The Urge for Going, based on the title of a Joni Mitchell song that includes the following lyrics:
See the geese in chevron flight flapping and racing on before the snow
They've got the urge for going and they've got the wings so they can go
They get the urge for going
When the meadow grass is turning brown
My clients were away for a few days, but had left me a house key, so I delivered the painting, leaving it propped in the planned niche with the spotlights on it, and nervously awaited their response...until I got a text the next day that shouted "It's PERFECT!!!" I am very glad that they love the finished work. However, I never hold a client to a purchase even on a commission. I only take on commissions that I feel I can accomplish to my own satisfaction and enjoy creating. If the buyer then refuses the finished piece, I can be confident that it will stand on its own and find another buyer at some future time.
And here is the completed work:

The Urge for Going, acrylic on canvas, 36" x 72" x 2"; collection P. Allen & J. Devlin